The projection system consists of two ultra short throw projectors and a rudimentary distribution system.
The same image can be projected on both screens simultaneously or both projectors can show separate images from two different sources.
The projection system is configured to project three types of video sources: digital (HDMI), analog ("VGA"), and wireless casting.
The power switch for the projection system is at the rear of the Sanctuary where the light switches are. Remember to switch off after use.
The manuals for the projectors can be downloaded from here.
The native display dimension of each projector is 1280 x 800 pixels. Video signals at this size, or an integral fraction of this size (for example 640x480), will be projected optimally, with one pixel, or an integral multiple, in the source signal displayed using one hardware pixel on screen.
Video sizes of other dimensions will result in floating point rounding inaccuracies.
Note that many entry-level laptops has a display size of 1366 x 768. Images of this size will still be shown, but the image will not fill the whole screen.
It is recommended to set your computer to use extended desktop and to send a 1280 x 800 video signal to the projector.
The video distribution schematic is as follows:
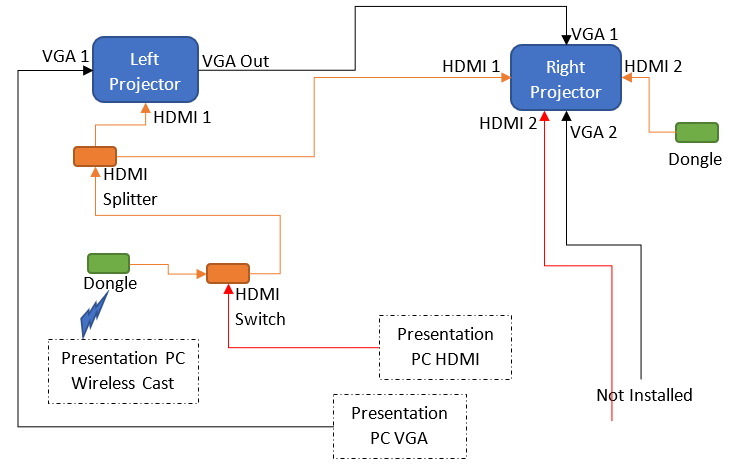
When the projector inputs are set to HDMI 1, the signal is taken from the output of an HDMI switcher, located below the left screen:
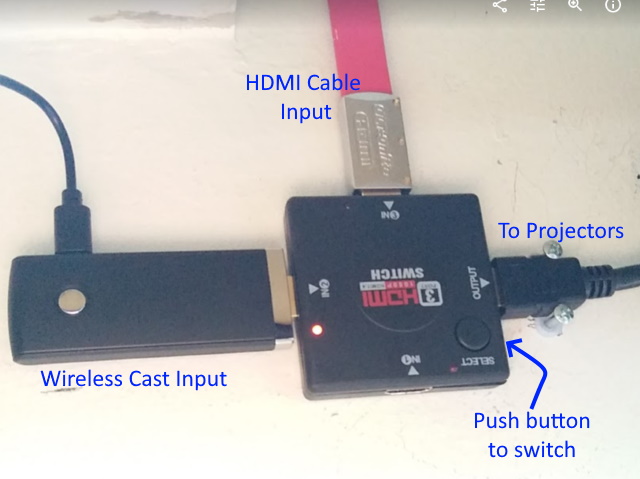
The switcher selects one of two sources: the long red HDMI cable, or a dongle set up for wireless casting.
If the projectors are set to VGA 1, the signal is taken from the long black cable with the D15 ("VGA") connector.
The remote controls for both projectors are operating on the same frequency. Point the remote at the projector instead of the screen. The screen reflects the infrared signals and will activate both projectors at the same time.
The remote controls are stored behind the bottom edge of each screen.
The HDMI cable to use is coiled and stored in the cupboard next to the piano.
This section is provided for maintainers of the system or those who wish to know more.
The HDMI switcher output is routed to a HDMI splitter located on top of the concrete beam at the left of the left projector. The splitter requires power and this is taken from the outlet installed on the top of the beam behind the screen.
[photo]
The HDMI splitter outputs go to HDMI 1 of the right projector, and to the presenter's monitor at the rear of the sanctuary (not hooked up yet).
Each projector is hanging off a cantilever setting plate (Epson temrinology), image below. The setting plate is mounted on a wooden box to make up for the depth of the concrete beam.
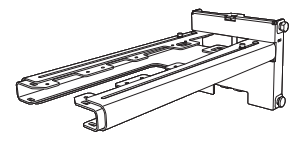
The wooden box is designed for the combined weight of the setting plate and projector ONLY. When working on the projector or its vicinity, it is of CRITICAL IMPORTANCE THAT NO ADDITIONAL FORCES ARE APPLIED to the projector, the setting plate or the box.
You must prepare your presentation document carefully targeted for a large auditorium.
Your presentation device must be equipped with one of the proper hardware interfaces:


 FERC
FERC