This document details the steps to follow for the recording of sermons. Follow this checklist closely.
Power up the recording PC.
Launch Audacity on the recording PC.
Click View Toolbars to ensure that the following are enabled:
On the Devices Toolbar, ensure the following settings:

Confirm that the Project Rate in the Selection Toolbar is at 32000Hz:

Ensure that the audio source is plugged into the microphone jack on the recording PC.
Press R (or click the red Recording button) and immediately press P (or click the Pause button). This will feed the incoming audio line to Audacity.
Try and obtain a test voice level from the Santuary microphones, and with the Microphone Recording Volume set at around 0.85:

Adjust the auxilliary output level on the mixer console so that the preacher's normal speaking volume is at about -12:

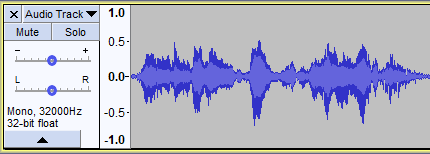
At the track view, the waveform should show a level of ±0.5
To begin recording, press R. The visual track display will show the waveform of the audio being recorded.
After the wanted recording is captured, click the Stop button .
Ensure that the Selection Tool is selected by pressing F1 or click it in the Tools toolbar:

By clicking at various points on the sound track, you can now use the green Play button to review the recording.
Use the Selection tool to mark out unwanted passages and press the Delete key to remove them.
When you are happy that the sound track now contain the sermon proper with excessive silent passages and other unwanted passages not relevant to the sermon removed, press Ctrl-Shift-E (or click File Export Export as MP3) to Export the recording.
The Save in folder is to be the Music folder.
The file name should be of the form: YYYYMMDD-title of sermon.mp3. Exclude from the title of the sermon any characters not acceptable for a Windows filename.
The Save as type must be MP3 Files.
Select the Format Options as follows:

In the Metadata Tags dialog, enter the preacher name for Artist Name, sermon title for Track Title and the Year. The preacher honorific should be one of Pastor, Elder, Deacon or Brother.
If the recording has been successfuly exported to MP3, you can exit Audacity without having to save the project.
Do not switch off the recording PC or do anything that will switch it off or put it to sleep.


 FERC
FERC